4.3 Print management
|
Previous
Chapter 3: File management
|
Next
Chapter 5: Hardware
|
 CHAPTER OVERVIEW
 At the end of this chapter, you should be able to:
- Create shortcuts.
- Use the Snipping Tool and Print Screen to take screenshots.
- Compress and decompress files and folders.
- Add new peripherals, such as a printer and mouse.
- Change the default printer.
- Explain what queue management is.
- Print files.
INTRODUCTION
When you open an application using the menu system, it can sometimes be time consuming. An easy way to save time is to create a shortcut for an application or program that you use often. In this section, you will learn how to create shortcuts, take screenshots, as well as how to compress and decompress files.
Print management is the managing and monitoring of various print tasks. Before learning how to print, you will learn how to add a new peripheral device, as well as how to do basic printing and apply printer queue management.
UNIT
4.1 File management skills
In this section, you will learn about basic computer management tasks that you need to do when working on a computer.
CREATING SHORTCUTS
This section will look at how to create a shortcut on the desktop for your favourite program, application, or website, for easy access. There are different ways to create shortcuts and in this section, we will look at some of these ways.
 Guided Activity 4.1
Option 1: If you want to create a desktop shortcut for your favourite program or file, do the following:
1. Right click on the .exe file.
2. Select Send To:
3. Click on Desktop (create shortcut) to create the shortcut.
A shortcut of this program will then be created on the Windows desktop.
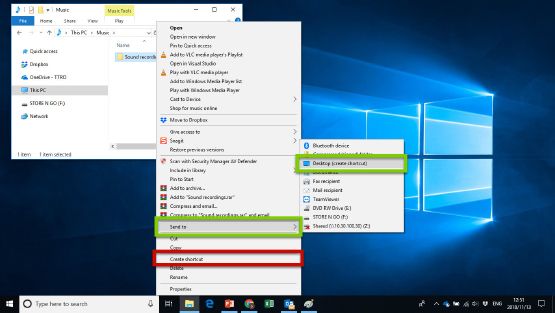
If you select Create Shortcut (indicated with the red rectangle), the shortcut will be created in the same location. In this example, the shortcut will be created in the Music folder.
 Guided Activity 4.2
Option 2: Another way of creating a shortcut would be to right click on the desktop, and then select New and then Shortcut.
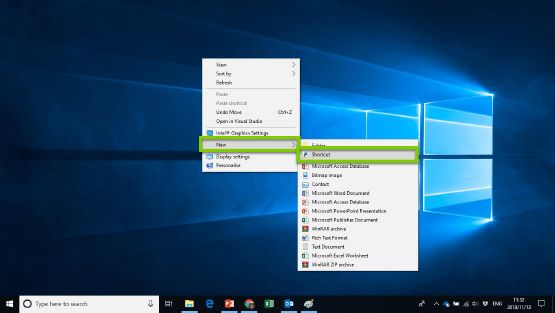
This will open the Create Shortcut wizard dialogue box.
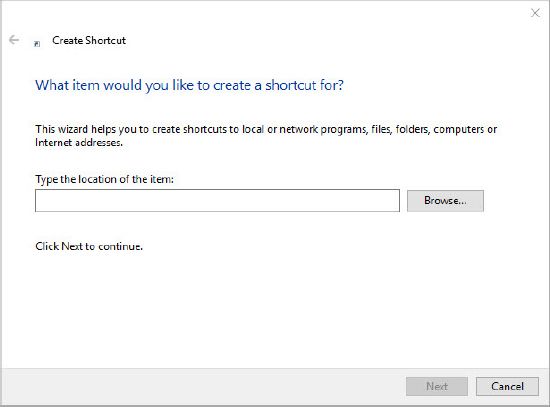
This wizard will help you to create a shortcut on the desktop.

Something to know
This only works using the Google Chrome browser; not in Edge or Internet Explorer.
 Guided Activity 4.3
Option 3: Lastly, we will look at creating a shortcut for your favourite website. The method might differ for different operating systems. For this example, we will look at creating a shortcut for a website using the Google Chrome browser.
1. Open your favourite website or web page.
2. Click on the Options button on the top right-hand side of the web page, as seen in Figure 4.4:
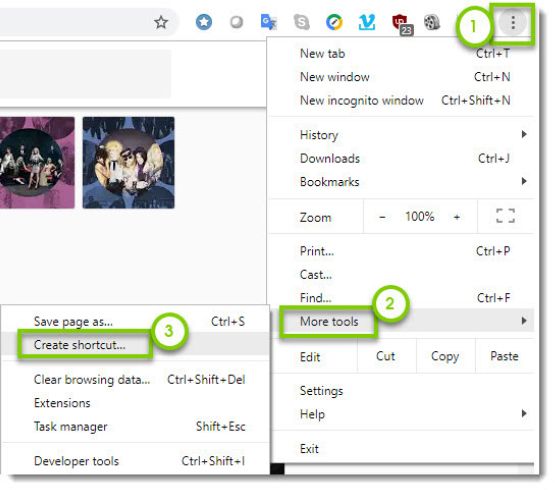
3. Go to More tools, from the drop-down menu and choose Create shortcut.
A dialogue box will appear asking you if you want to create the shortcut.
4. Click on Create, and the shortcut will be placed on the desktop.

Something to know
Desktop shortcuts can save you time to find a specific file, folder, or even a website.
TAKING SCREENSHOTS
A screenshot is an image of how the computer screen looks the moment you capture the screen. For example, it is a snapshot of whatever is displayed on the computer screen at that time.
Different models of computers have different shortcuts on how to take a screenshot. For most cases, you will press the ALT key and the PrtSc (print screen) key on the keyboard at the same time to take a screenshot of the selected window. PrtSc on its own takes a screenshot of the whole desktop.
This image is then saved to the clipboard. The clipboard is a memory space on the computer where data or graphics that are copied or cut are temporarily stored.
 Guided Activity 4.4
To save the screenshot permanently, you can paste it into an application. In this example, the application is Paint. Do the following:
1. Open Paint.
2. Select Edit then Paste from the menu bar of the Paint window. An easier way to paste the screenshot will be to use the hotkeys (Ctrl+V) and the image will be pasted into Paint.
3. You can then save the screenshot by clicking File and then Save As from the Paint window’s menu bar.
4. You can use the hotkeys (Ctrl+S) and save the file with the file name and file location you want, and then select Save.
 Activity 4.1
1. Create a new folder on the computer. Name it Practice.
2. In the folder, create a shortcut to the following:
a. Favourite document in My Documents folder
b. Two of your favourite programs
3. Open the Practice folder. Take a screenshot with Print Screen (PrtSc) of what is displayed on the screen.
4. Paste the screenshot in Paint.
5. Save the image as Practicescreen.jpeg.
6. Move this image to the Practice folder.
UNIT
4.2 File compression
Compressed files can be referred to as archived or zipped files and can contain many separate files in one large archive. This takes up much less space than the original files. Decompressing files is pretty much the opposite of compressing the files, which means to expand the archived or zipped folder back into its original form. In Windows, you can compress (zip) and decompress (unzip) files without installing any extra programs or applications. In this section, you will learn about compressing and decompressing files and folders.
COMPRESSING AND DECOMPRESSING FILES AND FOLDERS
 Guided Activity 4.5
To compress files or folders using Microsoft Windows, you can do the following:
1. From the Start menu, open This PC.
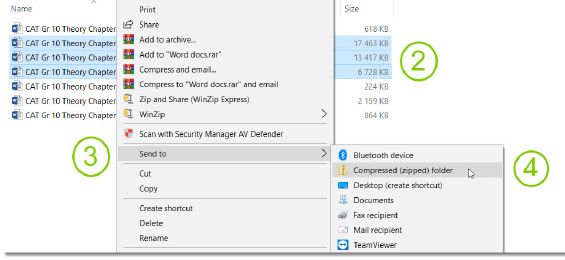
2. Select all the files and folders you want to include in the compressed folder by holding down the Ctrl key while clicking on each file.
3. Right click on the selected items and from the drop-down menu, choose Send To. Then select the Compressed (zipped) folder option. This will create a zipped file, in the same location, in which the files are located. The file extension for compressed folders is .zip.
4. Finally, enter a name for the compressed folder.

Something to know
By default, the new .zip file will have the same name as the file or folder that you compressed. However, if you compress multiple files and folders, the name of the .zip file will be the same as the first file that you clicked at the start of the compression.
DECOMPRESSING FILES OR FOLDERS
 Guided Activity 4.6
To decompress files or folders using Microsoft Windows, you can do the following:
1. From the Start menu, open This PC.
2. Look for the .zip file that you want to decompress, right click on it and choose Extract Files… A dialogue box will open. You should choose the destination for the decompressed files.
3. Click on New Folder.
4. Name the folder.
5. Click Ok. The files will be extracted to the folder that you created.

Something to know
When zipping or unzipping files or folders, the original files or folders are never deleted. If you need to delete these items, you will have to do it manually.
File compression has the following multiple advantages:
- Compressed files require less storage space. This allows you to fit more files onto storage devices.
- Because the files use less storage space, it can be transferred more easily and quickly between storage devices. This is especially true when the files need to be transferred over the internet.
- Because many files can be stored in one archive, it is easier to transfer the data and to ensure that the recipient gets all the correct files.
However, compressed files also have some disadvantages, with the most notable being:
- Some compressed files need specific software to decompress them. Fortunately, Windows 10 can decompress .zip files without requiring any additional software.
- Compressing and decompressing files can take a bit of time, depending on the level of compression and the size of the files that need to be compressed.

EXTRACTING ZIP FILES
 Activity 4.2
1. When sending a file as an email attachment, the email program cannot attach the file to the email. The following message is shown, but you do not want to send it using Google Drive.

a. Briefly explain how you can use an email to send a file as an attachment, even though it is such a large file.
b. What is the file extension of the answer in (a)?
c. After sending the file to the recipient, how does the recipient have access to the file?
UNIT
4.3 Print management
Print management allows you to install, view and manage printers. Print management is managing and monitoring various print tasks. Many software companies have proper print management software that coordinates all the print jobs that need to take place.
ADDING A NEW PERIPHERAL
Some printers have software that must be installed before it is connected to the computer. Always read the instructions that come with the printer to see if this is the case. However, in most cases, you can connect printers immediately.
 Guided Activity 4.7
To install a new printer, do the following:
1. Connect the printer to the computer, turn it on and turn the computer on.
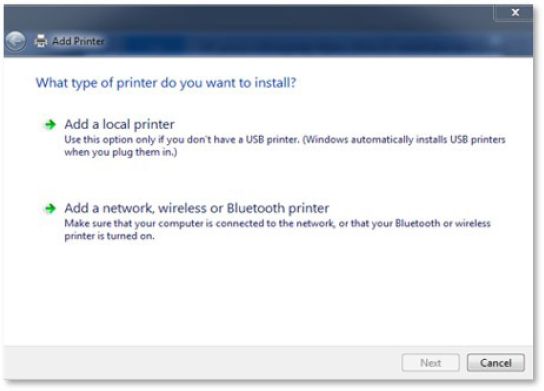
2. Click Start and look for Control Panel > Devices and Printers > Add Printer, and then choose the type of printer that you are installing.
3. This opens the Add Printer wizard, which will guide you on how to add the printer.
 Guided Activity 4.8
To add a mouse,
1. Click on Start > Devices and Printers > Add a Device.
The Add a Device window will open.
2. The window will show you a list of devices that are available to connect.
3. Click on the device that you want to connect to (in this case, the mouse).
4. Click Next and follow the instructions.
CHANGING THE DEFAULT PRINTER
If you already have a printer added to your computer, this printer will always be used as the default printer. However, if you have more than one printer installed on the computer, you can change the default printer.
 Guided Activity 4.9
To change a default printer, you can do the following:
1. Click on Start.
2. Click on Control Panel and choose Devices and Printers.
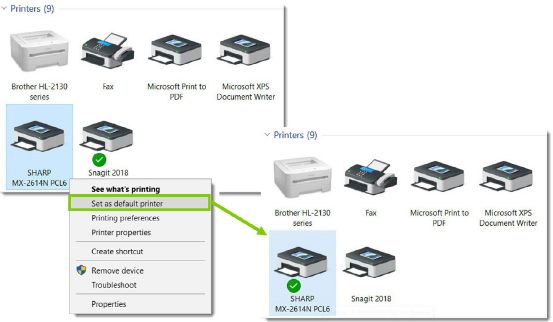
3. Right click on the printer you want and from the drop-down menu, select the Set as default printer.
After you have done this, the default printer will have a tick next to it to indicate that this is the current default printer.
BASIC PRINTING
If you need to print a document or image, you can do so in the following way.
 Guided Activity 4.10
1. Select the document or image that you want to print.
2. Right click on the file and choose Print.
3. If a dialogue box appears, click OK, or the Print button.
The computer will immediately send the pages to the printer, which should start printing the pages automatically.

Something to know
To print a number of documents one after the other, select all the items, then right click on the selected items and choose Print. The documents will be printed in the order in which they were selected.
PRINTER QUEUE MANAGEMENT
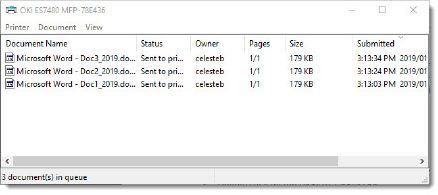
When a printer needs to print more than one document, it is placed in a queue and printed according to the sequence that it was selected.
 Guided Activity 4.11
To check what you are printing:
1. Click on Start.
2. Select Control Panel > Devices and Printers.
3. Double-click on the Default Printer.
The Printer window will open and this will show in the order in which the documents will be printed.

Something to know
If you need to cancel or pause a print job, you can right click on the file in the printer queue window and select the action you require.
 Activity 4.3
Mimi has her own business and wants to buy a new printer, which she needs to connect to her desktop. She is going to use her printer to print quotations and invoices for her clients. She also needs to connect the printer to the desktop in the office.
1. Should Mimi buy a laser or an ink tank printer? Motivate your answer. Consider the cost of the printer, as well as the printing cost.
2. Mimi’s focus is on the quality of the print-outs rather than cost. Which printer should she buy?
3. After she has bought her printer, briefly explain to Mimi how she should connect this printer to the desktop.
4. Explain why nothing is printing after Mimi has connected the printer to the desktop.
REVISION ACTIVITY
1. The following icon appears on the desktop of a computer:

2. a. How can you tell that the icon is a shortcut?
b. What is the benefit of using a shortcut to an application? (1)
c. How would you launch the application using the shortcut? (1)
d. What is the name of the application to which the shortcut refers? (1)
3.a. What is the name of the Windows 10 tool that can be used to create a screenshot? (1)
b. What is the difference between pressing PrtSc and pressing Alt together with PrtSc (Alt +PrtSc)? (2)
4. The screenshot below shows the printers that are installed on Thalia’s computer.

a. What is the name of the default printer? (1)
b. Describe briefly how you would make it the default printer. (2)
5. The screenshot below shows a list of documents waiting to be printed.

a. What is the name given to this list of documents? (1)
b. You have decided that you no longer want to print the Microsoft Word document. Describe briefly how you would remove this document from the list. (2)
c. You need special paper to print the full-page photo. You are only able to purchase the special paper the next day. Describe briefly what you would do to temporarily prevent the photo from printing. (2)
6. Samiya, a Grade 10 learner, has a folder called Grade 9, which is taking up a lot of space on her computer. How could she reduce the amount of space the folder takes up without deleting any of the files inside the folder? (2)
TOTAL: [17]
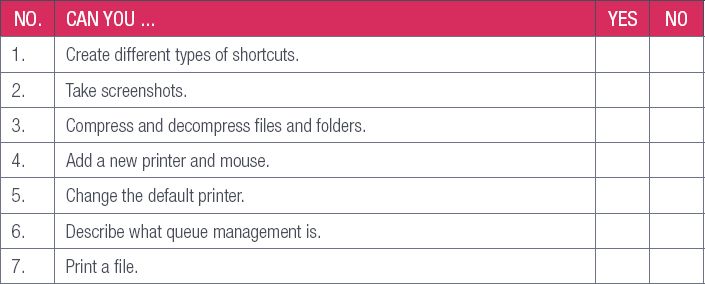
AT THE END OF THE CHAPTER
Use the checklist to make sure that you worked through the following and that you understand it.
|
Previous
Chapter 3: File management
|
Table of Contents |
Next
Chapter 5: Hardware
|


